Docati 

Request a trial-version now and see for yourself!
Contact us at [email protected].

Quickstart - Exercise 2: Creating lists

Outline

In this exercise we will enhance the template created in exercise 1: we will use the ForEach-placeholder to produce the list of ordered products.

Setup

The prerequisites for these exercises are listed on the Quick-Start introduction-page.

This exercise uses the same data-file as the previous exercise. You can download it here: http://static.docati.com/samples/order-basic.xml (you must save it to a local folder on your computer, you need it later).

Steps

  1. We're continuing our work on the previous template. Open the "Order1.docx"-template you created in the first exercise.
    * If you skipped exercise 1, you can also download it here: http://static.docati.com/samples/Order2-Starter.docx
  2. Now save the template with the new name “Order2.docx”.

The template contains a large table to hold a list of ordered products. The ForEach-placeholder can create such a list. It does so by adding its contents for each item in the dataset. Since we want to create a table, we need the ForEach to contain a single table row, so that it will insert this row for each item.

  1. The template already contains many empty table rows. Select the first empty row in the table: make sure you select the complete row, not just its cells. The Select-functionality on the Layout-tab may assist you with that.
  2. While the first row is now completely selected, click on the ForEach-button on the Docati-ribbon.
    * The ForEach-placeholder was added around the selected table row. This is a powerfull way to create tables in your documents. Actually, this same trick works as well with bullet-lists, paragraphs, etc!
  3. For the Data Query specify: Item
    * This query specifies an item in the data-file. However, since there are more than one items in the data, this query selects them all and inserts a table row for each item.
  4. Since the ForEach is suppose to create the table rows, the remaining empty rows must be deleted. Make sure you don't accidentally remove the first row which is contained inside the ForEach-placeholder!
    * The template should now look like this:

    ForEach at work

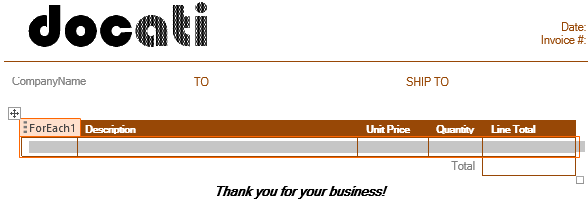
If you generate the document now (go ahead, just try it!), the resulting document will contain a table with two rows because the data file contains two items. However, these rows are empty, since we did not yet specify what data to put in each individual cell.

  1. Put the cursor in the first cell of the empty table row and add a ValueOf-placeholder. Set its Name to “ItemNr” and its path to PartNumber.\ Feel free to generate the document again.
    * The query for the partnumber is relative to the Item selected by the ForEach. The ForEach provides the item as a so-called context-node. If this makes no sense now: don’t worry. You’ll get it once you start using this more often.
  2. Add ValueOf-placeholders for the Description, UnitPrice and Quantity column. These are the queries for the columns:
    • Description: ProductName
    • UnitPrice: USDPrice
    • Quantity: Quantity
  3. Generate the document. The output should look like this:

    ForEach with content

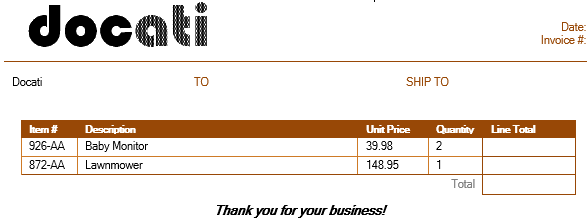
The last column in the table should hold the line total. For the Baby Monitor that should be 79.96 (39.98 x 2). However, the line total is not part of the data. This means we need to calculate it.
The ValueOf-placeholder supports basic calculation operators, so it can do this for us.

  1. Put the cursor in the “Line Total”-cell and add a ValueOf-placeholder with the name "LineTotal".
    Specify its query as: USDPrice * Quantity
    Check the 'Use advanced syntax'-checkbox: regular queries do not support formula's, only an advanced queries (xpath) does.
    Generate the document to see the results.

The table is now completely populated, except for the Total-cell below the table. This requires a complex formula and is part of exercise 4.

Continue with the next exercise >